
- SSH is the fastest way to control a headless Raspberry Pi, but by default it only works on your local network.
- Port forwarding: fast, but exposes a port to the world and doesn’t work behind CGNAT.
- DDNS + port forwarding: same risk as above, with a stable hostname.
- VPN/mesh (Tailscale or WireGuard): secure, but you manage the network yourself.
- Outbound tunnel agent (SocketXP): secure, zero open ports, works behind NAT/CGNAT/Firewall/cellular/satellite networks and adds a fleet dashboard for Raspberry Pi fleet management if you run more than one Pi.
- Fastest secure path: install SSH via Raspberry Pi Imager, install the SocketXP agent, run one command, SSH in from anywhere, no router login required. Full steps below.
This guide covers remote SSH access to a Raspberry Pi over the internet: why it doesn’t work by default (NAT/CGNAT), the four realistic ways to solve it (port forwarding, DDNS, VPN/mesh, or an outbound tunnel agent), and a full step-by-step SocketXP setup. It ends with a comparison of SocketXP against Raspberry Pi Connect and Tailscale, followed by security tips and an FAQ. It should help whether you have one Pi on a shelf or a few dozen in the field.
Why can’t you just SSH into your Pi from anywhere already?
Your home router sits behind NAT (Network Address Translation) — every device on your Wi-Fi shares one public IP address, and your Pi’s real address (like 192.168.1.42) is invisible to the internet. Mobile and satellite connections (4G/5G, Starlink) often go a step further with CGNAT (Carrier-Grade NAT), where you don’t even control the router, so traditional port forwarding is impossible.
That’s the whole problem this guide solves. There are two fundamentally different ways to solve it:
Open a door inward — port forwarding, DDNS, reverse SSH tunnels you host yourself. You control everything, but you’re now responsible for the security of an internet-facing port.
Let the Pi call outward instead — the Pi makes an outbound, encrypted connection to a cloud relay server you don’t have to expose or maintain. This is how SocketXP, Tailscale, Raspberry Pi Connect, and Cloudflare Tunnel all work, and it’s why they’ve largely replaced manual port forwarding for new setups.
Want SSH Access to Your Raspberry Pi from Anywhere?
No port forwarding, no static IP needed. Just a secure outbound tunnel to your Pi.
Quick comparison: which remote access method should you use?
| Method | Setup effort | Works behind CGNAT? | Open ports on your router? | Best for |
|---|---|---|---|---|
| Port forwarding | Medium (router config) | No | Yes (risk) | One-off local labs, full control |
| DDNS + port forwarding | Medium | No | Yes (risk) | Same as above, with a stable hostname |
| Reverse SSH tunnel (self-hosted VPS) | High | Yes | No (on your Pi) | Devs who already run a VPS |
| Tailscale / WireGuard VPN | Low–Medium | Yes | No | Personal mesh across your own devices |
| Raspberry Pi Connect | Low | Yes | No | Single hobbyist Pi, official Raspberry Pi tooling |
| SocketXP | Low | Yes | No | Fleets of Pi/IoT devices, RBAC, web-terminal access, device management at scale |
We’ll walk through the SocketXP setup in detail, then give you an honest read on when Raspberry Pi Connect or Tailscale might suit you better.
Step 1: Set up your Raspberry Pi (updated for Raspberry Pi OS / Bookworm)
The fastest path today is to configure everything before first boot, using Raspberry Pi Imager (v1.8+):
- Download Raspberry Pi Imager and select your Pi model and OS (Raspberry Pi OS, 64-bit recommended).
- Click the gear icon (Edit Settings) before writing the image.
- Under General: set your hostname, a custom username/password (Raspberry Pi OS no longer ships a default
pi/raspberry login), and your Wi-Fi SSID/password. - Under Services: toggle Enable SSH -> Use password authentication (or paste your public key directly here if you already have one).
- Write the image, boot the Pi, and confirm it’s online with
ping raspberrypi.localor by checking your router’s client list.
Already have a running Pi and don’t want to reflash it? Enable SSH the classic way:
sudo raspi-config
Navigate to Interface Options -> SSH -> Enable -> Finish. (Note: this menu was renamed from “Interfacing Options” to “Interface Options” in recent Raspberry Pi OS releases — if your tutorial says otherwise, it’s outdated.)
Step 2: Install SocketXP and connect the Pi to the cloud gateway
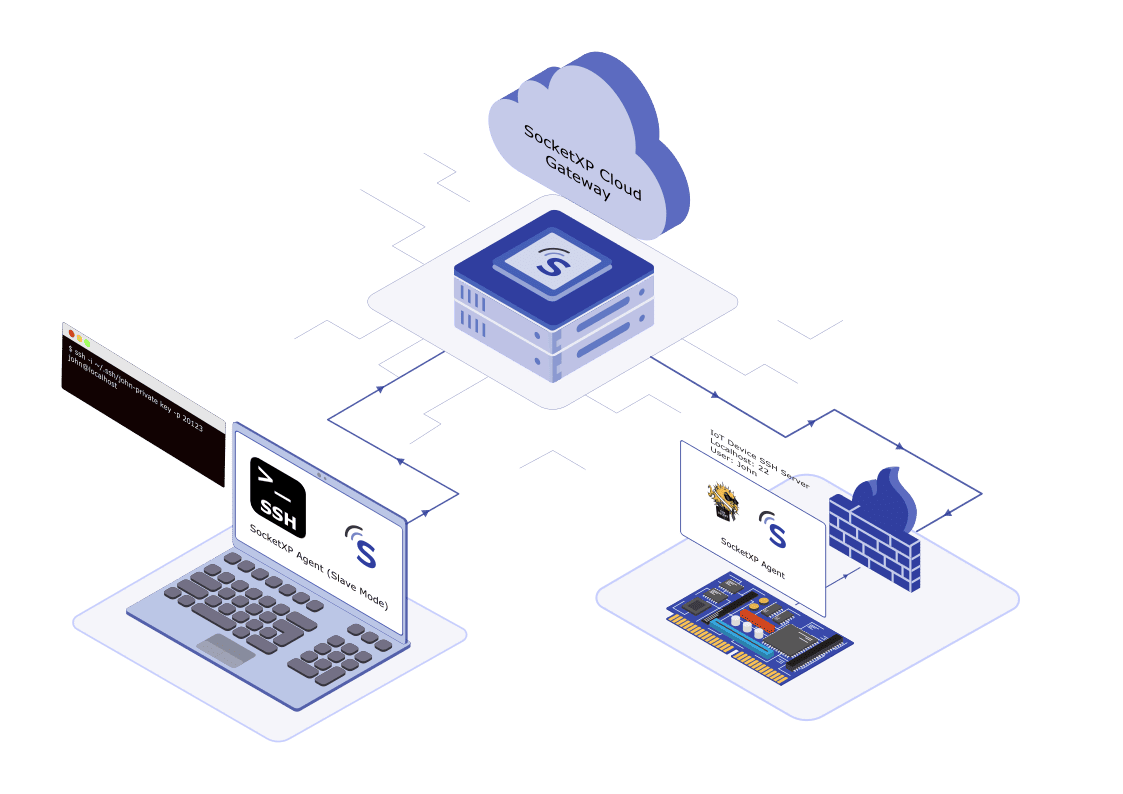
Remote access to the SSH server on your Pi needs a lightweight always-on agent that opens a secure outbound tunnel — no inbound firewall rule needed.
How the SocketXP tunnel actually works
- The SocketXP agent runs on your Pi and opens an outbound SSL/TLS connection to the SocketXP Cloud Gateway, authenticated with your account token.
- This tunnel endpoint is private by default — SocketXP never creates a public TCP endpoint that random internet clients can hit. Only you (via the SocketXP web portal or the SocketXP agent in slave mode) can reach it.
- You then SSH in either through the browser-based web terminal, or through your own SSH client (PuTTY, OpenSSH) via a local-proxy endpoint.
This “agent calls outward, nothing calls inward” model is why it keeps working when you switch from home Wi-Fi to a 5G hotspot or Starlink — there’s no router config to break.
Step 3: Set up IoT Remote Access software
Remote access to the SSH server running in your Raspberry Pi requires installing and running a secure remote access software (a VPN like software) on the Pi.
Once the remote access software is installed on the Raspberry Pi, the Raspberry Pi device can be securely accessed from anywhere in the world.
SocketXP, a popular IoT Remote Access software platform, enables you to easily manage, control, monitor and remote access a fleet of Raspberry Pi from a web portal.
How SocketXP IoT Remote Access solution works
First, you need to install the SocketXP agent on your Rasperry Pi.
The agent will securely connect (using an SSL/TLS tunnel) to the SocketXP IoT Cloud Gateway using an authentication token.
You can then SSH connect to your Raspberry Pi from the SocketXP Web Portal or using your own SSH client such as PuTTY.
Follow the steps below to install and setup SocketXP agent on your Raspberry Pi.
Step 3.1: Download and Install
Follow the download and install instructions to install the SocketXP agent on your Raspberry Pi device.
Step 3.2: Get your Authentication Token
Sign up at SocketXP Web Portal and get your authentication token.
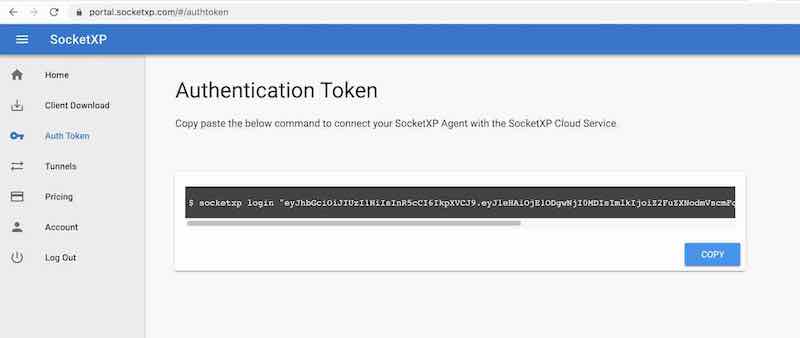
Use the following command to login to the SocketXP IoT Cloud Gateway using the auth token.
$ socketxp login [your-auth-token-goes-here]
Step 3.3: Connect the device to the SocketXP Cloud Gateway
Use the following command to connect the Raspberry Pi to the cloud gateway using a secure SSL/TLS connection.
 $ socketxp connect tcp://localhost:22

Connected to SocketXP Cloud Gateway.
Access the device securely using the SocketXP agent in IoT Slave Mode.
For the security of your device, SocketXP IoT Solution doesn’t create any public TCP endpoints that can be connected by any SSH client from the internet.
SocketXP private tunnel endpoints are not exposed to the internet and can be accessed only using the SocketXP agent (in IoT slave mode using the auth token of the user) or through the web terminal in the SocketXP web portal as shown below.
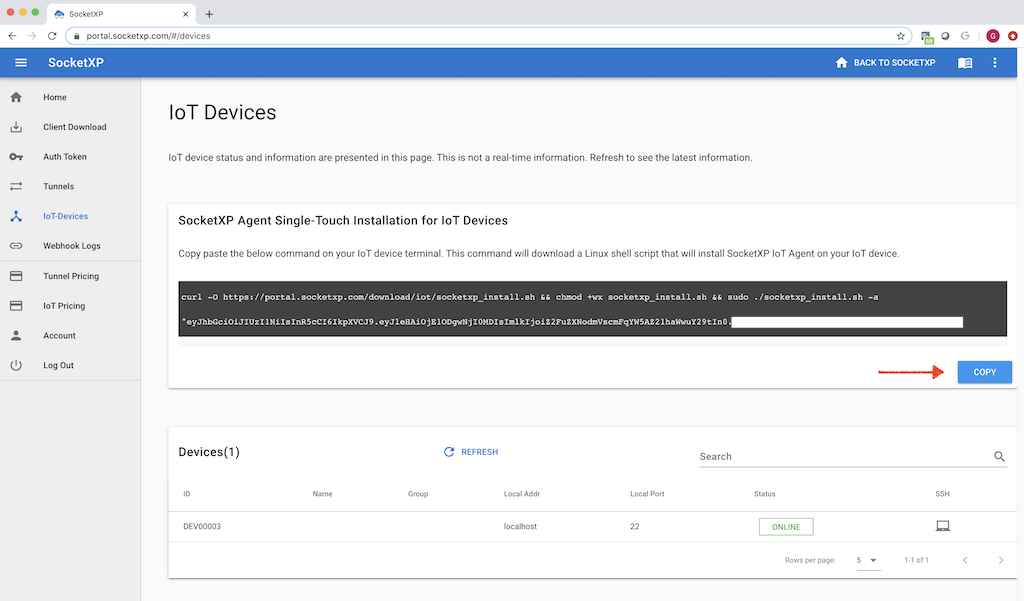
Single-Touch Installation Command
The 3 step instruction explained above to setup SocketXP on your Raspberry Pi is a tedious process, if you have thousands of Raspberry Pi devices to install, configure and manage.
With this in mind, SocketXP IoT Remote Access Solution also provides a single-touch installation command for installing and configuring SocketXP IoT Agent on large number Raspberry Pi devices.
Copy and paste the below single-touch installation command from the SocketXP Portal page on to the terminal of your Raspberry Pi. The command shown below will download a shell script that will install, configure, setup SocketXP IoT agent on your Raspberry Pi. After the command completes, the Raspberry Pi device would show up as online in the SocketXP Portal page.
Step 4: Accessing the Raspberry Pi SSH from your laptop
Your Raspberry Pi is now ready to be accessed remotely from anywhere in the world using SSH by simply logging in to the SocketXP Web Portal.
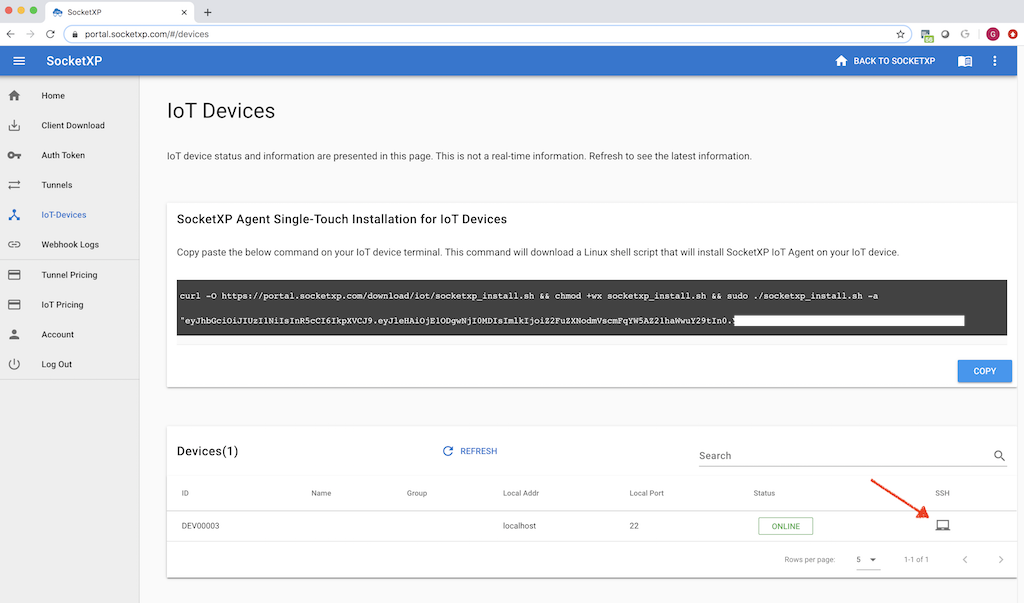
Head to the “Devices” section, find your Raspberry Pi device listed in the table. Click the terminal icon next to your device. It will take you to a SSH login screen.
Provide the login and password setup for your device. Once the login is successful, it will put you in a shell prompt.
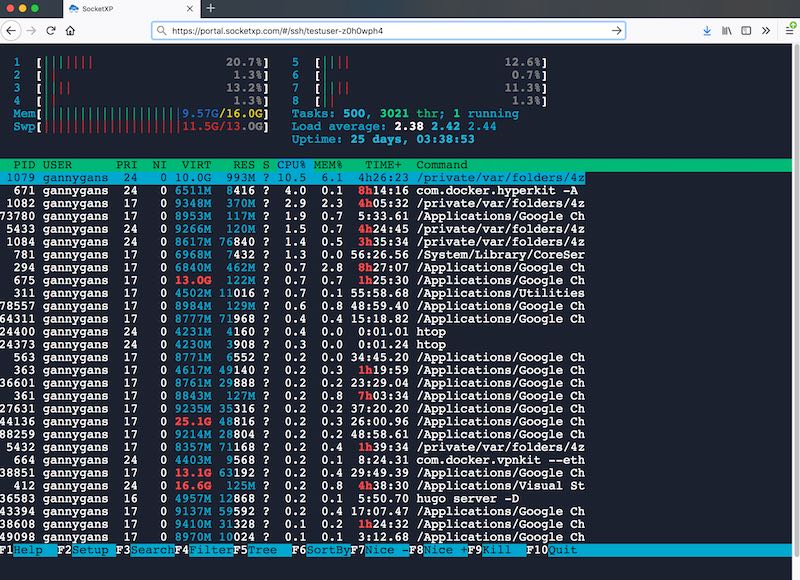
The above screen capture shows the “htop” command output from an SSH session created using the SSH web terminal window in the SocketXP web portal.
Step 4.1: Configuring SocketXP agent to run in slave mode
This is an alternate method for connecting to your Raspberry Pi from a remote location using the SocketXP solution.
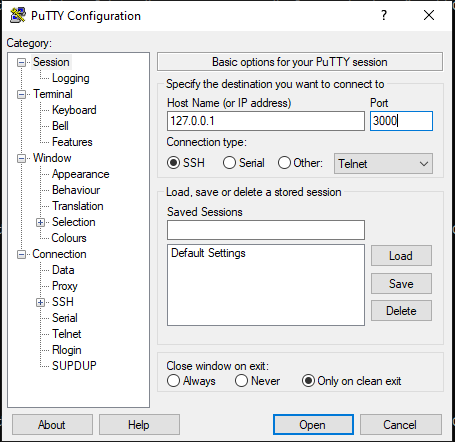
If you don’t want to access your Raspberry Pi from the browser and you want to access it using your own SSH client such as PuTTY then follow the instructions below.
This method is extremely useful if you want to setup and use SSH public private keys to remote access your Rasperry Pi.
First download and install the SocketXP agent software on your accessing device (such as a laptop running Windows or Mac OS).
Next, configure the agent to run in slave mode (or local proxy mode) using the command option “–iot-slave” as shown in the example below.
$ socketxp connect tcp://localhost:3000 --iot-slave --peer-device-id "2233-4455-abcd-34445" --peer-device-port 22 --authtoken <auth token>

Listening for TCP connections at:
Local URL -> tcp://localhost:3000
You shall find the device ID of your Raspberry Pi from the SocketXP Portal page in the IoT Devices section.
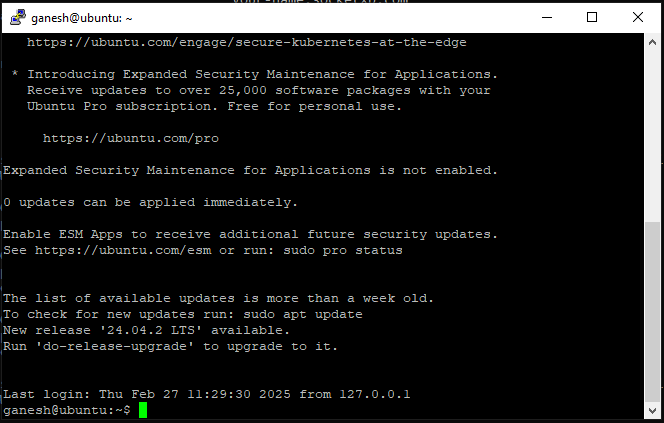
Now you can access your Raspberry Pi’s SSH server using the above SocketXP local endpoint, as shown below.
The following example uses a command line based OpenSSH client tool to connect to the Raspberry Pi IoT SSH shell.
$ ssh -i ~/.ssh/john-private.key john@localhost -p 3000
You can use your own SSH client such as PuTTY to connect to your remote Raspberry Pi SSH shell.
How to install OpenSSH server on your Raspberry Pi device
All Raspberry Pi devices come with SSH Server installed. If your device is not Raspberry Pi based and you want to know how to install and configure SSH server, SSH clients, SSH public/private keys for remote SSH access, continue reading the below sections.
OpenSSH is a free open source software that uses SSH protocol to create secure and encrypted communication channels over computer networks.
Open SSH is developed by the Open BST Community and it is released under a Simplified BSD License
OpenSSH comes with additional features such as SFTP and SCP to perform secure file transfer and secure copy over a computer network.
To install and run SSH server on your Raspberry Pi device, execute the following commands:
Debian/Ubuntu Linux:
First update your linux and then install the openssh server
$ sudo apt-get update
$ sudo apt-get install openssh-server
The following commands will enable and run SSH server as a daemon in the background.
$ sudo systemctl enable ssh
$ sudo systemctl start ssh
RHEL/CentOS Linux:
$ sudo yum update
$ sudo yum -y install openssh-server
Then enable SSH server and start it.
$ sudo chkconfig sshd on
$ sudo service sshd start
SSH uses port 22 for communication. If it is not enabled already, execute the following command to open up the SSH port on your linux system.
$ sudo /sbin/iptable -A INPUT -m state --state NEW -m tcp -p tcp --dport 22 -j ACCEPT
$ sudo service iptables save
How to install SSH client on your client machines
Use the following command to install SSH client on your laptops or any device from where you would remote SSH into your Raspberry Pi.
Debian/Ubuntu
$ sudo apt-get update
$ sudo apt-get install openssh-client
RHEL/CentOS
$ sudo yum update
$ sudo yum -y install openssh-client
How to create and setup SSH public private keys
SSH uses a public/private key based encryption algorithm for encrypting the communication channel. Use the ssh-keygen command to generate SSH keys for those clients that need to SSH into your Raspberry Pi devices.
Go to your client machine (Laptop, for eg.) and open up a terminal and execute the following command. Follow the instructions on the screen to create a public/private key pair.
$ ssh-keygen -b 4096
Generating public/private rsa key pair.
Enter file in which to save the key (/home/your_home/.ssh/id_rsa):
The keys will be saved usually in your home directory under the “.ssh” folder.
Leave the private key in your client machine. Copy just the contents of /home/your_)home/.ssh/id_rsa.pub file and paste it (actually append it) to the “~/.ssh/authorized_keys” file in your Raspberry Pi device where the SSH server runs.
From now on, you can login to your Raspberry Pi remotely using the SSH private key in your client machine using the following command
$ ssh -i ~/.ssh/id_rsa.key john@tunnel.socketxp.com -p 23224
Disable Password Authentication on your SSH Server
After configuring your SSH server and client to use private/public key for authentication, it is wise and safe to turn off password based authentication, because passwords are relatively easy to crack.
Before you perform this step, make sure you have setup your public/private key pairs correctly and you are able to login using them. Otherwise, once you disable password authentication, you’ll be locked out of your Raspberry Pi.
To disable password authentication, open the SSH server’s configuration file as a sudo user.
sudo nano /etc/ssh/sshd_configInside the file, search for a directive called PasswordAuthentication. This may be commented out. Uncomment the line and set the value to “no”. This will disable your ability to log in to the SSH server using account passwords:
PasswordAuthentication noSave and close the file when you are finished.
To actually implement the changes we just made, you must restart the service.
On Ubuntu or Debian machines, you can issue this command:
sudo service ssh restartOn CentOS/Fedora machines, issue the following command:
sudo service sshd restartAfter completing this step, you’ve successfully transitioned your SSH daemon to only respond to SSH keys.
Security Best Practices:
As with any remote access solution, enabling SSH on a Raspberry Pi comes with security implications.
You need to follow SSH remote access security best practices to keep your Raspberry Pi secure from any potential threats.
It is essential that you periodically review these security best practices and ensure that your Raspberry Pi is adhering strictly to the security guidelines.
Advantages of using SocketXP for Raspberry Pi remote SSH access:
SocketXP uses secure reverse proxy SSL/TLS tunnels to connect to your Raspberry Pi over the internet, so that your device is not directly exposed to the internet. Also, the data transmitted is encrypted using SSL/TLS.
SSH uses the same cryptography technology used by banks and governments to exchange highly confidential data over the internet.
The data transferred gets encrypted end-to-end between the SSH client and the SSH server.
SocketXP has no way to decrypt or eavesdrop your encrypted data without knowing your SSH private keys. SocketXP merely acts as an SSL/TLS reverse proxy server for your encrypted data traffic transmitted through the SSH connection.
Conclusion
Remotely accessing your Raspberry Pi via SSH provides a convenient and powerful way to manage your Raspberry Pi from anywhere in the world.
By following the steps outlined in this article, you can easily enable SSH, install the SocketXP agent on it, and connect to it remotely using SSH.
Once connected, you can perform various tasks to manage your Raspberry Pi remotely, including updating packages, installing/removing software, configuring settings, transferring files, managing processes, and performing system maintenance.
SocketXP is a cloud based IoT Device Management and Remote Access Platform that simplifies managing and monitoring IoT devices at scale.
With remote access, you can unlock the full potential of your Raspberry Pi and use it for a wide range of applications with ease and convenience. Happy remote Raspberry Pi-ing!
For a complete overview of all Raspberry Pi remote access options — SSH, VNC, web apps, headless setup, Windows, Mac, and mobile — see the full SocketXP solution page.
Frequently Asked Questions
How do I SSH into a Raspberry Pi from outside my home network?
Use SocketXP to create a secure outbound tunnel from your Raspberry Pi. After installing the agent and connecting it to SocketXP, you can SSH into the Pi from anywhere using the SocketXP web terminal or a standard SSH client—without opening ports on your router.
Does remote SSH to Raspberry Pi work on cellular or Starlink internet?
Yes. SocketXP works on any internet connection including 3G/4G/5G cellular networks and Starlink satellite. The agent creates an outbound connection, so carrier-grade NAT (CGNAT) and strict firewalls do not block the connection.
Is it safe to remotely access a Raspberry Pi over the internet?
Yes, with SocketXP it is secure. All traffic is encrypted with SSL/TLS. You can additionally harden access with SSH public key authentication (disable password login), and use SocketXP's RBAC to restrict which users can connect to which devices.